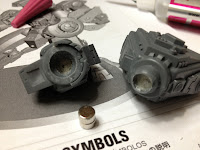
So on to the build. I know I want to change its pose so off come all the pegs that define the pose you see on the box cover and in comes my drill. I'm using pieces from a large bull-clip for my pins and I'm using Apoxie Sculpt (2 part epoxy clay) to fill various bits so my pins will have something to be drilled and glued into. See the gray blobs in the pics to see where I've used the Apoxie Sculpt.
Filled the feet since I may magnetize it to a base....still undecided.
Filled the waist so I could magnetize it for posing but also for easier storage and transport.
Filling in parts of the upper torso for a magnet to the waist and one for the head.
Filling in spots in the arms for magnets.
And in the legs too.
Test fitting a big pin for one of the legs.
Hopefully I'll get to work on it some more this evening.
Thanks for looking and as always, CC is welcome and appreciated.


I agree 100% on filling in the feet. I did this and pinned my models into their bases in order to help them stable after custom posing them. I wish I had re-enforced the hands as you did in order to put magnets in them, but oh well. Looks like a great start and I hope you enjoy building this model. By far this has to be one of the best kits that GW has released this year.
ReplyDeleteThanks Judge Dredd! (great name)
ReplyDeleteI'm finding that as I've gotten older.... that I'm more into building, personalizing, modding, the models than I am into the game. I'm having a lot of fun with this guy and I'm now thinking I might have to get a Wraith Knight!
Hopefully I'll have an update with some magnetization soon.