Not dead yet...
Just the usual distractions, work, kids, X-Wing miniatures game, etc. The Raptor Legion / Chapter are still around and will hopefully get some love soon. I'll try and post some X-Wing and 40k related stuff soon.
Monday, August 25, 2014
Thursday, October 3, 2013
Raptors Chapter mini update
Salvaged a ton of assault troop legs and other bits from old models. Primed and Base costed a lot of bits including a new Vanguard squad and Sternguard squad. Also added some here to the Mark III guys.


Just a quick update from my cell phone.
Join the Talk Wargaming Blog Network
If you're not familiar with or have not ever visited the Talk Wargaming web site and or blog then you've been living under a rock. It's a great resource for all things wargaming and If you have a wargaming blog of your own, you should consider joining their Blog Network. Learn more here: The Talk Wargaming Blog Network

Sunday, September 8, 2013
Raptors Legion/Chapter debut and studying.
No real Riptide update I'm afraid but the matte varnish I finally settled on has arrived so I'll be able to get back to work on the Riptide sometime after Wednesday. Why Wednesday you ask? Well I'm studying for the Cisco Certified Network Professional (Routing and Switching) exams and I'm scheduled to take the switching exam on Wednesday. So lots of studying and very little hobby progress lately.
The Matte Varnish I settled on after some online research is.... Vallejo Polyurethane Satin Varnish and so far it's been great. I've only brushed it on but will try it through the airbrush later this week.
With the Riptide set to the side this past week, I was able to turn my attention (when not studying) to some of the Heresy MK III armor that I've had sitting around untouched for months. I've been dreaming of making a Raptors Legion/Chapter ever since I first read about them in Imperial Armour Three: Taros Campaign. They are a successor chapter of the Raven Guard.
See more about the Raptors Legion/Chapter at the Lexicanum
Also, If anyone has any Forge World Raptors items, Decals, Rhino doors, LR doors etc and you're willing to part with them.... please let me know. I can do $ and or trade depending on what you're after.
As always, CC is welcome and appreciated and thanks for looking!

All airbrush so far and before a Nuln Oil wash.

After the Nuln Oil wash was applied in certain places.


Stormtalon WIP. All Airbrush so far.

Jetbikes kick ass!


Contemptor WIP.
He'll be striding through a puddle and up onto the broken up tiled part.
Friday, August 30, 2013
Riptide build part 9: Still Painting
I'm running into some issues with finding a good matte finish.... I have the new-ish Badger Minitaire "Flat Coat" which in my experience IS NOT FLAT AT ALL!!!
I've had some issues with some paint rubbing off in some places (little nicks etc here and there) while I'm handling the model. I had sprayed it with what I thought was a good coat of Army Painters "Anti-Shine" and then another coat only to find out later (through some online research) that it's not actually meant to provide a protective layer, only to dull down a previous shiny coat.
Lesson learned. Now to nail down a good clear protective coat.... any suggestions are appreciated.
Anyway, I tidied up some of the Ocher (yellow) on the body, arms, legs and weapons. Not done the Ocher yet but close. I'm still not sure about the feet though. I may go with black on the feet and on all the "white" circles you see including the circle in the Empire logo on the shield and chest. The head lens will get a color (still undecided) and an attempt at some OSL (wish me luck).
Off to research some protective coatings. As always, CC is welcome and appreciated. Thanks for looking!


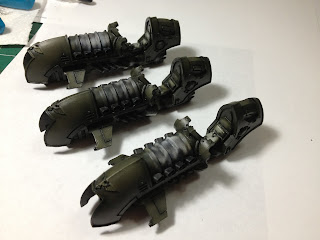
The following two pictures (Marine Heresy Legs) are an example of the Badger Minitaire "Flat Coat" that I've found is NOT FLAT AT ALL! I've read mixed reviews online where some people get a Flat finish and others (like myself) get a very Shiny finish. Anyone use is and want to chime in, please do.


Tuesday, August 27, 2013
Riptide build part 8.1: Base Update
I picked up a Secret Weapon Miniatures (SWM) Masterclass Scenics: Mud and Water kit about a year ago as well as a collection of SWM's weathering pigments.
Until now I had not used any of them.
Pro Tip - If you follow the instructions and you mix some of the realistic water with some of the pigments and or the sand or plaster..... mix just a little bit and set it aside for about 4-5 minutes to allow the pigments/sand/plaster to soak up the realistic water.
I just mixed some up, thought it looked great, started applying it to the base and suddenly (4-5 minutes in) I had a rather solid and hard to do anything with clump of brown (see 4th pic). I then thought..."Gee, I'll just add more realistic water to thin it back up." That sort of worked but by the time I got it thinned out again so I could apply it to the base...I'd used 70% or so of my realistic water and had WAY more brown mud than I could possibly use on this base.
So take your time mixing it up so that you won't wind up wasting a lot like I did.
All that said, I think it's great, works really well and is easy as heck to use even with little or no experience. Like I said, I'd not used any of it before so this was my first go at it and I think the final image in this post shows how well it looks even when done by a novice like myself. Granted there's still more I want to do to the base but I could just leave it as it is.
Note that there's several days between a lot of these pics as it takes about 24 hours for the realistic water to dry. Because you should only apply it in very thin layers, it can take multiple applications (days) to get the depth that you want. I believe if you pour it too thick it will dry and be foggy looking. I wanted a clear look so I've been taking my time.
I did mix in 2 or 3 different sizes of model train gravel/ballast. I have some Army Painter stick on bushes/weeds etc as well as some other foliage items that I may use on it. I'm sort of liking the minimalist look that it has currently with just the two tiny weeds/bushes.
You'll see in some of the pics where the recessed/lower areas or puddles got darker...that's just where i airbrushed on some of the Army Painter dark tone.
As always, CC is welcome and appreciated!
Thanks for looking!


Saturday, August 24, 2013
Riptide build part 8: Don't Look at the Feet!
Little more paint on the Riptide but in my quest for a non green color I fudged up the feet. I forget what combo of paint I used but it was far too yellow for me and my attempt to go over it with Vallejo Ocher didn't work out either. I finally settled on just straight Vallejo model air Ocher which I was turned onto by Jawaballs in a recent blog/video where he explains the paints he's using on his Tau army.
You can see my use of the Ocher on the gun, the head and on the shield so far. I'll use it on some more places but It's getting late so it'll have to wait till tomorrow.
As always, CC is welcome and appreciated! (and ignore the feet!)
Thanks for looking!


You can see my use of the Ocher on the gun, the head and on the shield so far. I'll use it on some more places but It's getting late so it'll have to wait till tomorrow.
As always, CC is welcome and appreciated! (and ignore the feet!)
Thanks for looking!


Subscribe to:
Posts (Atom)